
For many homeowners, the cost of professional hvac duct cleaning can be prohibitive. While regular duct cleaning is recommended for indoor air quality and HVAC system performance, you may be wondering if it’s possible to clean your own ducts as a do-it-yourself project. With the right equipment and safety precautions, cleaning your air ducts yourself can absolutely be done. Here are the steps to safely conduct your own DIY duct cleaning.
Gather supplies
Before tackling an hvac duct cleaning project on your own, you’ll need to gather the proper supplies and protective gear:
- Respirator mask rated for dust, mold, and other airborne particles
- Safety goggles
- Work gloves
- Duct cleaning brushes (should extend at least 12 inches into ducts)
- Vacuum with HEPA filter
- Debris collection bags or buckets
- Duct cleaning solution
- Rags or paper towels
- Wire or string (to retrieve dropped items)
- Flashlight
- Camera (optional, to inspect ducts)
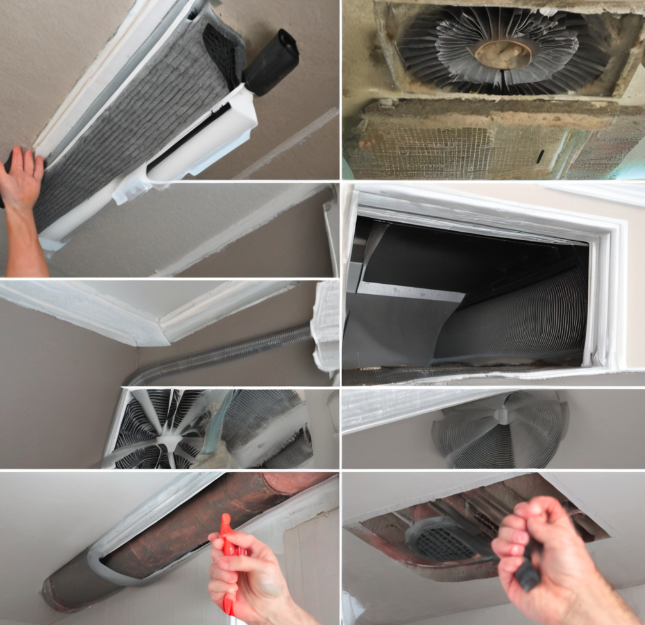
Prepare your duct system
It’s important to properly prepare your duct system before manually cleaning it. Start by turning off the HVAC system and shutting fresh air intake vents. Wrap fresh air intake vents tightly with plastic to prevent debris from entering.
Remove vent registers throughout the home by gently twisting them off. Set them aside in a clean area. Disconnect and wrap flexible duct connections to rigid ducts. This allows for cleaning deeper inside ducts.
Safely clean accessible ducts
Don your respirator, goggles, and gloves before entering dusty areas. Start by vacuuming out all accessible vent registers and flexible ducts using the vacuum hose. This extracts the loose, surface-level debris.
Next, use duct cleaning brushes to scrub inner duct surfaces. Work sections at a time – pushing debris towards the vacuum source. Dip bristled brushes in cleaning solution as needed to dissolve grease or material. Periodically empty full collection bags.
Inspect and clean any rigid duct sections that can be safely accessed from the underside of your home or crawlspace. Use caution on ladders or moving through tight spaces. Recruit help if any areas are unsafe to reach alone.
Rinse ducts and dry thoroughly
Once all accessible duct surfaces have been thoroughly brushed and vacuumed, it’s time to rinse. Adjust your vacuum hose to suction mode and run clean water inside ducts while slowly moving up and down with the vacuum running.
This flushes out residues while extracting rinse water through the vacuum. Repeat rinsing process until rinse water runs clear, ensuring all cleaner residues are removed.
Thoroughly wipe down and dry all duct surfaces with rags to prevent future mold. Pay close attention to joints, corners and hard to reach spots prone to moisture issues. Allow overnight drying before proceeding.
Clean or replace furnace & AC unit components
You’ll also want to thoroughly clean interior components of your HVAC unit. Vacuum out cooling coils, fan blades and drain pans. Inspect and replace filters as part of your overall cleaning project.
Consider having system components professionally cleaned or serviced if heavily soiled or experiencing HVAC issues. Look inside supply and return plenums as possible for any trapped debris.
Reassemble & inspect your work
Carefully re-install all vent registers ensuring a tight seal to finished surfaces. Reconnect any removed flexible duct sleeves securely. Turn your HVAC system back on and ensure it is functioning properly.
Use a flashlight to visually inspect all ducts for any remaining debris, especially in corners or crimped spots. Make sure to clean fully before wrapping up the project. Document any necessary future repairs for a professional.
Safety and limitations of DIY duct cleaning
While duct cleaning can potentially save money as a DIY project, there are some inherent limitations and risks to consider:
- Some sections may not be safely accessible from inside homes, requiring professional-grade equipment.
- Heavily soiled ducts may need thorough pressure washing/rinsing best handled by professionals.
- Ensuring ducts fully dry after cleaning to prevent microbe growth is challenging without proper equipment.
- Lack of camera inspection means potential problems may go undiscovered.
- Disturbing duct insulation during project risks damaging vapor barrier integrity.
So weigh risks versus reward by assessing how dirty your specific ducts truly are. Consider the DIY approach as a light maintenance cleaning and still schedule full professional hvac duct cleaning every 5-10 years for a deeper clean. Stay safe and call experts if you have any concerns over access, contamination levels or potential system issues. With care, a self-duct-cleaning project can still yield air quality benefits between professional services.
Final Words:
In conclusion, DIY duct cleaning can be a cost-effective maintenance approach if done carefully. However, for severely dirty ducts, intricate systems, or unsafe accessibility, professional cleaning is best. Homeowners should assess dirt levels and follow safety. Self-cleaning works best as routine maintenance between full professional cleanings every 5-10 years. With preparation and care, some air quality benefits can be gained while saving versus professional services.