
You are rearranging furniture and a doorknob punches clean through the wall. A plumber cuts an access panel that never quite got closed up properly. The kids discover that drywall and hockey sticks do not mix. Or you just bought a place and the previous owners left behind a collection of mystery holes that tell a story you would rather not know. However it happened, a hole in your drywall is one of those things that is easy to ignore for a week and then somehow impossible to stop noticing.
The good news is that drywall holes are about as fixable as home problems get. The less good news is that how you fix them matters quite a bit, and the difference between a repair that blends in perfectly and one that you can spot from across the room usually comes down to the method, the materials, and whether you matched the texture and paint properly. Getting it right the first time beats doing it twice.
Whether you are dealing with a small punch-through or a section that needs full replacement, professional drywall hole repair services take care of the whole job from patch to paint so the repair genuinely disappears into the wall. No visible seams, no texture mismatch, no paint shade that is just slightly off. Just a wall that looks like nothing ever happened.
The Most Common Reasons Drywall Gets Holes
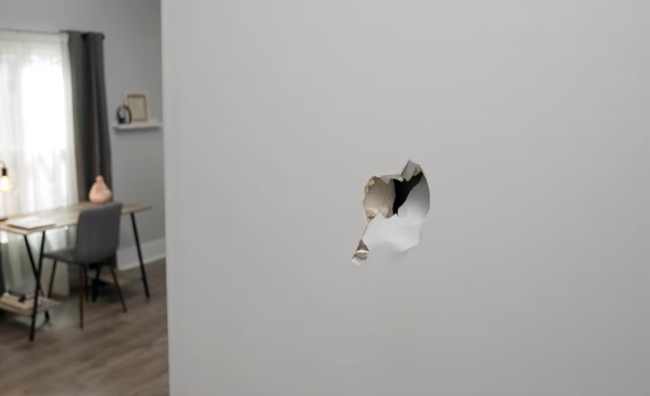
Door handles are responsible for a surprisingly large share of drywall holes in residential homes. A door without a proper stopper, swung open with any real force, puts the handle or knob directly into the wall at exactly the height where the impact does the most damage. The result is a clean circular hole that is remarkably satisfying to cause and considerably less satisfying to look at every morning. The fix for the hole is straightforward. The fix for the underlying problem is a door stopper, which costs about four dollars and will save you from repeating the experience.
Plumbing and electrical access is another major contributor. Any time pipes, wiring, or fixtures need attention inside a wall, the drywall gets cut. Sometimes those access cuts get properly patched afterward. Sometimes they get covered with a piece of trim that does not quite fit, or a picture frame that has been in suspiciously the same spot for fifteen years. A proper repair closes those openings cleanly and lets the wall function as an actual wall again rather than a decorative cover for the problem behind it.
Small Holes vs Large Holes: The Repair Approaches Are Different
Not every drywall hole is the same problem, and the right repair method depends on the size and type of damage. Nail holes and small screw holes, the kind left behind by picture hanging hardware, are minor surface repairs that involve a small amount of filler compound, a sand, and a paint touch-up. These are legitimately DIY-able for most homeowners and do not require professional intervention unless there are a large number of them scattered across freshly painted walls where matching the finish becomes the harder part of the job.
Medium holes, from a few centimetres up to about 15 centimetres, typically require a backing support and a patch, either a drywall patch kit or a hand-cut piece of new drywall secured to a backing. This is where the texture and feathering of the compound becomes important, because poorly feathered compound edges create a visible shadow line on the wall even when properly painted. Getting the compound thin at the edges and the overall patch flat to the surrounding surface is the skill that separates a visible repair from an invisible one.
When the Damage Goes Beyond the Surface
Some drywall damage is not just a hole. Water damage that has caused the drywall to soften, sag, or develop mould behind the paper face requires removal of the affected material rather than a surface patch. Patching over water-damaged drywall without addressing the moisture source and replacing the compromised material is a repair that will fail, and it creates the conditions for mould growth to continue behind the new surface.
Similarly, drywall that has been damaged through repeated impacts in a high-traffic area, like a hallway corner or the wall beside a frequently used door, may benefit from more than a patch. Corner bead on exposed corners, impact-resistant drywall in high-traffic zones, and properly installed door stoppers address the conditions that cause repeated damage rather than just fixing the current result of them.
The Texture Matching Problem Nobody Warns You About
Texture matching is the part of drywall repair that trips up most DIY attempts and is the reason a professionally patched wall looks different from a homeowner-patched one. Most walls in GTA homes are not perfectly smooth; they have some degree of texture, whether that is a light skip trowel, an orange peel spray, a knockdown finish, or the heavier stucco-style texture common in older builds. Matching that existing texture in the repair area requires either the right spray equipment, the right technique with a brush or trowel, and a practiced eye for how the surrounding texture actually looks up close.
Even if the texture is matched well, the paint is the next hurdle. New paint over a patch, even in the same colour, often looks different from the surrounding wall because existing paint has aged, faded slightly, and developed a slightly different sheen. Feathering the paint out beyond the patch area and ideally painting the full wall from corner to corner produces the best colour and sheen match. Spot-painting only the patched area is the approach most likely to leave a visible difference.
Drywall Repair After a Renovation
Renovations almost always leave drywall work behind. Removed walls leave open framing that needs new drywall. Relocated doors and windows leave openings that need to be framed and drywalled. Moved electrical outlets and plumbing fixtures leave patches. HVAC work leaves duct openings. A renovation that goes right still produces a list of drywall repairs at the end that needs to be addressed before painting and finishing can happen.
Post-renovation drywall repair is different from a simple hole repair because it often involves larger areas, new framing connections, and the need to integrate new drywall into existing surfaces smoothly enough that the paint coat ties everything together without visible seams. This is where the taping and mudding skills that make a finished wall look truly finished are most visible, and where a professional result is most clearly distinct from an amateur one.
How Fast Can a Professional Actually Fix It
This is the question most homeowners ask once they have decided to stop living with the hole and do something about it. The honest answer is that the vast majority of residential drywall repairs, from small punches to medium-sized access holes, can be completed in a single day’s visit. The patch goes in, the compound is applied and dried, sanded, textured to match, and painted. You go from hole in the wall to no visible evidence that anything was ever wrong, typically within a few hours.
Larger repairs involving water damage remediation, significant area replacement, or post-renovation work across multiple walls take longer because the scope is larger and the compound requires proper drying time between coats. But even those projects are measured in days rather than weeks. The wall that has been bothering you for six months is probably a same-day fix that you just have not scheduled yet.